Monday, November 25, 2013
How To Share Blogger Posts Automatically On Twitter using Feedburner
Sometimes when you have an account on twitter and you think that How can I use my twitter account to gain more traffic ? If you are looking for the answer of the same question then you have come to the right place.
Twitter is an online social networking and microblogging service that enables users to send and read "tweets", which are text messages limited to 140 characters. Registered users can read and post tweets but unregistered users can only read them.Facebook and Twitter are the two most used social mdeia platforms in the world. Twitter has 6 rank in the US traffic and is continuously increasing. That is the reason why everyone want to make their blog popular on this platform.
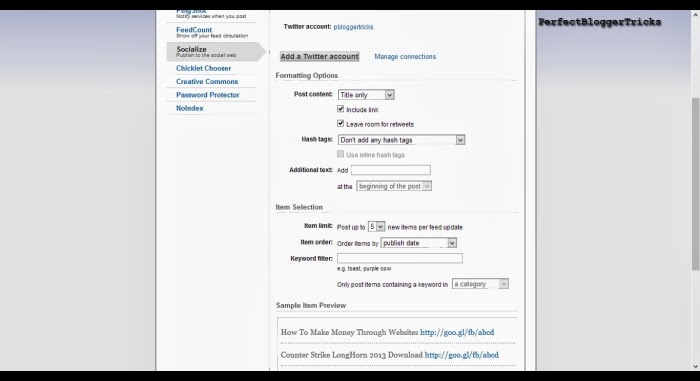
So the first thing you are going to do is go to Feed-burner and register your blog. After that you can edit your blog details according to your needs. Then enter your feed burner feed, Go to Publicize and then Socialize. There a screen like this will appear.

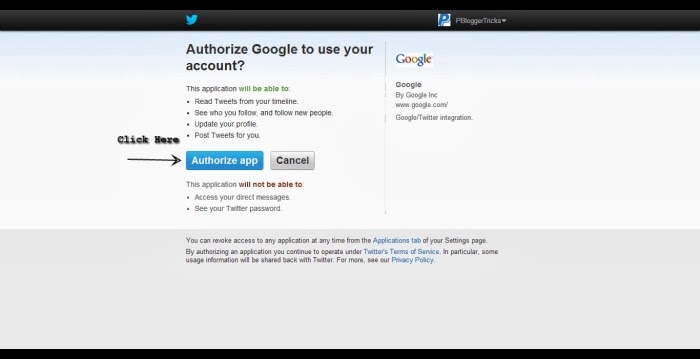
Then as you can see there is an option of adding Twitter account. When you click on that link you will be redirected to a page like this.

Click on the Authorize app and you are done. Now whenever you share a post on your blog it will automatically be posted to your feed and also on your twitter account.
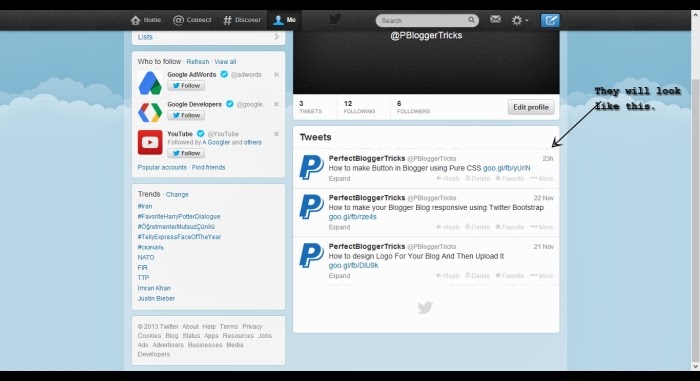
Want to know how they will look on your tweets ? See Below.

Have Something to Share ?
If you know any other way to share your blogposts online please do share. because Sharing Is Caring. We will love to hear from you.
Sunday, November 24, 2013
How to make Button in Blogger using Pure CSS
How can anyone make a button with special effects without using images ? Is it even possible ? Yes ! it is.

Today we are going to learn about how you can make buttons using only CSS and no images.Yes! you can make buttons without using any images and add special effects too. How ? we are going to see that very soon.
So the first thing you are going to do is go to Best Css Button Generator and choose your style for the button from the list on your left side. There are 3 categories there.
1. Recent ( That are previously uploaded)
2. Popular ( Which are frequently used)
3. Search ( You can search your own style)
The first two categories describe their purpose well. But the last category i.e. Search. You can search your style by going to it and then type in your style like (Black,Facebook,Green) etc. Just like in the screenshot below.
.png)
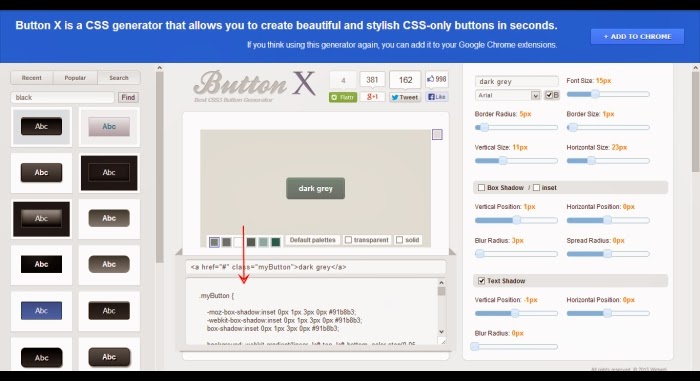
Now when you have choose what style you want to use you are then ready to apply it on your blog. But there are also several things you can edit about your button just like Colour, Shadows, Border , Border-Radius, Font, Font Size etc. All of them are found on the right side as you can see in the screenshot. When you are ready configuring your button then you can click on your button and there a code will appear below the button.
.png)
You should copy the code from that box and then upload it to your blogger interface where you want to use it. you can paste the code of the below box inside b:skin and the code in the above box anywhere else in your template.
We will soon share a way to make navigation bar using these css buttons. Keep in touch with us to see that.
We will soon share a way to make navigation bar using these css buttons. Keep in touch with us to see that.
Have something to share ?
We will definitely love to hear from you. If you have something to share please comment and we will try our best to response back and get to you as soon as possible. Until then Have a nice day and enjoy.
Friday, November 22, 2013
How to make your Blogger Blog responsive using Twitter Bootstrap
Well ! Hello There Guys. Today we will be discussing about responsive web design or layout. In the new era of the internet many people are using responsive web design because of the greater use of mobile and tablets and they all know that if they want to succeed they will need to focus on not only the desktop users but also mobile users etc.
Twitter bootstrap is one of the widely used tool for designing websites. It will give a neat design along with plenty of flexibility. We can easily design any website using twitter bootstrap without writing any single line of css. And also this is free of cost so you can get it Here. You can also edit it and change it according to your needs.
Our website is also running on bootstrap blogger template but we have made several changes which differentiates between us and others.
Features of Bootstrap blogger template:
Powered by twitter bootstrap
SEO friendly blogger template.
Minimal design
Easier template modification.
Grid system and responsive design
Re-usable components
Easy to use CSS
JavaScript plug-ins
Auto read more
You can check the responsiveness of the template by applying it on a test blog and then by going Here. Or you can directly go to the maker's website and check the responsiveness by the link I provided above and by adjusting the width and height of your browser's window.
Bootstrap 3 Blogger Template:
 |
| Bootstrap 3 Blogger Template |
Earlier version of bootstrap template was powered by twitter bootstrap 2.x.x. They have released another blogger template which is powered by twitter bootstrap 3 (RC2). This means it is a beta version, They will come up with the latest version of this template when they release latest version of bootstrap 3.
Bootstrap 3 is sleek, intuitive, and powerful mobile-first front-end framework for faster and easier web development. So bootstrap 3 is much much improved version of bootstrap 2.
How to edit open graph meta data:
Code for open graph will look like this, make sure that you made necessary changes.
- <meta expr:content='data:blog.metaDescription' name='description' property='og:description'/>
- <b:if cond='data:blog.pageType == "item"'>
- <meta expr:content='data:blog.pageName' property='og:title'/>
- <meta expr:content='data:blog.canonicalUrl' property='og:url'/>
- <meta content='Bootstrap Template' property='og:site_name'/>
- <meta content='article' property='og:type'/>
- <b:if cond='data:blog.postImageThumbnailUrl'>
- <meta expr:content='data:blog.postImageThumbnailUrl' property='og:image'/>
- <b:else/>
- <meta content='https://blogger.googleusercontent.com/img/b/R29vZ2xl/AVvXsEh9iaO44WYYXraUZCoWAhcbHzxp4lFIpbLlcqdRKPSr8GI6maMNKpchhjfakMiL93__3M8MuAzKkBA1R5n9NNj81fdb5NtD7SGJ00aal6tJsxdmMd6990uFF_rK1sB1RAOvx_Ljjc_2p3WY/s1600/apple-touch-icon-144-precomposed.png' property='og:image'/>
- </b:if>
- <b:else/>
- <meta expr:content='data:blog.title' property='og:title'/>
- <meta expr:content='data:blog.canonicalHomepageUrl' property='og:url'/>
- <meta content='Bootstrap Template' property='og:site_name'/>
- <meta content='blog' property='og:type'/>
- <meta content='https://blogger.googleusercontent.com/img/b/R29vZ2xl/AVvXsEh9iaO44WYYXraUZCoWAhcbHzxp4lFIpbLlcqdRKPSr8GI6maMNKpchhjfakMiL93__3M8MuAzKkBA1R5n9NNj81fdb5NtD7SGJ00aal6tJsxdmMd6990uFF_rK1sB1RAOvx_Ljjc_2p3WY/s1600/apple-touch-icon-144-precomposed.png' property='og:image'/>
- </b:if>
- <meta expr:content='"en_US"' property='og:locale'/>
After adding open graph meta you should change og:site_name “Bootstrap template” with your blog or website name.
Other important opengraphs are ‘og:image’ and ‘og:type’. og:image “https://blogger.googleusercontent.com/img/b/R29vZ2xl/AVvXsEh9iaO44WYYXraUZCoWAhcbHzxp4lFIpbLlcqdRKPSr8GI6maMNKpchhjfakMiL93__3M8MuAzKkBA1R5n9NNj81fdb5NtD7SGJ00aal6tJsxdmMd6990uFF_rK1sB1RAOvx_Ljjc_2p3WY/s1600/apple-touch-icon-144-precomposed.png” should replace with any image that suits for your home page.
Here is the code for apple touch icons, don’t forget to replace icon images for your website.
- <link href='https://blogger.googleusercontent.com/img/b/R29vZ2xl/AVvXsEh9iaO44WYYXraUZCoWAhcbHzxp4lFIpbLlcqdRKPSr8GI6maMNKpchhjfakMiL93__3M8MuAzKkBA1R5n9NNj81fdb5NtD7SGJ00aal6tJsxdmMd6990uFF_rK1sB1RAOvx_Ljjc_2p3WY/s1600/apple-touch-icon-144-precomposed.png' rel='apple-touch-icon-precomposed' sizes='144x144'/>
- <link href='https://blogger.googleusercontent.com/img/b/R29vZ2xl/AVvXsEhrKRHV-_aTh38tx5pGd7g6Lcl4OMIH_XaITU3-cLnpKTxMqIHAxATAu2FD_rXwx_5_gAuVVNEHf8JIY4Ic88mzVUNPUtpdME8r_3hVJcZY-Cneu7UvMmDnp2Rq8nRAgOlvjR-iHtdsz7mS/s1600/apple-touch-icon-114-precomposed.png' rel='apple-touch-icon-precomposed' sizes='114x114'/>
- <link href='https://blogger.googleusercontent.com/img/b/R29vZ2xl/AVvXsEhsqnbBg3aXJteG0hKCutFBTgZoz98c4KKpqqfYDz2wm-EfkBp1N7_iKrbMasfbQYaLroHvB-j91lBHZwVXm8Xl-F8voAhy08nqmhXgyel3WTW4_uvFtiOQxdtjTYPDG5tbtlV-265Q3v8v/s1600/apple-touch-icon-72-precomposed.png' rel='apple-touch-icon-precomposed' sizes='72x72'/>
- <link href='https://blogger.googleusercontent.com/img/b/R29vZ2xl/AVvXsEj1lhbaG0amJOZ-h9hX6Z4FLjAXi3x0uIWPdrUxwk1F2bGWSIHYNBI61cyLsNc_8uioTw4iNMcOXXk4NoUc_a29cEiS48_1ZtH3UvFt9mDUksxaQsPkuTbt7Y3VS2k5J5VlYPk8xkP1hdOL/s1600/apple-touch-icon-57-precomposed.png' rel='apple-touch-icon-precomposed'/>
Last OF All:
So I think I have told you everything about the responsive blogger template design. You can grab it for free from the website I mentioned above and you can also share your thoughts about it.
Finally if you have any questions regarding responsiveness,styles,buttons etc you can ask us in the comments. Feel free to ask.
Thursday, November 21, 2013
How to Design Logo for your Blog and then Upload
Every company, organization, brand and even small blogs. All of them need a Logo which represents them and differentiate them from other companies. The use of logos as far back as 2300 B.C, and the practice still remain with all the businesses today. Yes ! all businesses because I cannot think of any organization, brand etc. which don't have their own logo. So today we will learn how to make your own logo for your brand new blog that will represent you over the Internet. Have you ever thought associating a logo with your own brand or you just use simple text.
Free Services Online :
There are many ways through which you can make/build your logo for your perfect blog. Like using free services online like Flaming Text. They offer a large number of designs through which you can build your logo. They currently have 250 different styles to choose from. The best that I like is Aurora-Borealis. You can also configure designs and text according to your needs. But you may also remember that free services don't offer quality and that will make a bad impact on your blog or website.Adobe Photoshop :
You can also use Adobe Photoshop to make your logo but it will be quite difficult if you don't know how to use Photoshop. There are several tutorials which will teach you how to make your logo. Tuts Plus is a website which will teach you.Logo Designer :
Or you can try a logo designer which will make your work a lot easier. You don't need to do any kind of editing etc. just download a logo designer like JETA. They have a Free version and a paid one for Business. Free version offers many designs and shapes to use but as we all know that paid version always wins because we pay for it and they give us additional features with it.Paid Designers :
There are also many websites which offers you Designers to which you pay and tell them what you want your logo to be and they will start building your logo. But always remember NEVER ever tell them to "design what you want" this will be the most frustrating description ever. You can tell them what you don't want and how it should be. If you choose some special brands then they will offer you money back guarantee if and only if you don't like it and if it is not according to your needs.Last Of All :
How can you upload your logo to your blog. If your on WordPress it would be really simple and if you are on blogger then you can see below.
- Go To Blogger Dashboard.
- Go To Layout.
- Click on edit and upload your logo there.
Subscribe to:
Comments (Atom)


